Monday, February 25, 2013

Homemade Baguettes!

I tried to make baguettes the other day and look what happened.

The photo is turned vertical, but as you can see-way too round, way too chubby.  It is adorably cute, though, I have to say and now I'm thinking of writing a comedy series called Mr. Fat Bread.  But I cannot be daunted!  So I scoured the Internet and found another recipe from King Arthur and look at the wonders of this great brand of flour:

Oooh, it looks so good you can almost smell it right through the computer, right?  I was so happy when I saw these lovely, crackly loaves of goodness.  So, 1st and foremost, I would always use King Arthur flour for everything.  Great tasting products always come from them.  And secondly, patience is your friend.  Don't rush the starter or the relaxing stages or fermentation.  You want those yeast to really do their job to develop bubbles and flavor.  So you can find the recipe and directions here.  And now more beautiful photos.

 This is the dough loaves relaxing before they go into the oven.  Be sure to spray the loaves with water prior to baking to recreate the steaming effect.

 That steaming effect gives that classic crackly crust while still have a nice pillowy interior.

 And this is the stack of baguettes when they catch the sunlight just right in the morning before you devour these for breakfast!

Friday, February 22, 2013

Kale Chips

Kale chips.  They're simple.  They're easy to make.  And they're delicious.  Enough said!

Kale Chips
From the Meat Lover's Meatless Cookbook

Ingredients
1 bunch kale (approximately 5-6 cups)
1 TB olive oil
1/2 teaspoon salt
1/4 teaspoon red pepper flakes

Remove the stem and middle rib of each kale leaf.  I usually just tear off the leaves with my hands to make it easier.  Wash the leaves thoroughly and dry thoroughly with paper towels.  If the leaves are too large, you can tear them into 3 inch long pieces.

Put dry leaves in a bowl and toss with remaining ingredients.  Once thoroughly coated, spread on a lined baking sheet.  Bake at 350F for about 8-10 minutes until crispy.  Remove from oven and enjoy.  You can eat them alone as snacks, sprinkled on salads, or even on top of soups!  Store in air tight container for about 2 days.


Tuesday, February 19, 2013

Zuppa Toscana

My little brother invited me and our sisters to have dinner with his new girlfriend.  We were all in a tizzy because he's our baby brother and this was his first girlfriend.  Of course, this was a big event for all of us!  Sometimes, I have to remind myself that having three older sisters could be daunting for him, but then I remember, we're so fun though!!

So he told us that her favorite was Italian food and we didn't want to scare her and take her to a fancy-schmancy place with $20 plates, so we decided on somewhere non-intimidating where the food was decent-Olive Garden.  Not my first choice, but this night was definitely not about me.

Needless to say, his girlfriend was a doll and very sweet.  We saw my brother and her holding hands under the table and it made us all sigh, young love!  So this post is dedicated to my little brother and this continual journey of finding your soul mate. 

Even though my entree was nothing to sing about, I did really enjoy Olive Garden's Zuppa Toscana (and how can you not like the endless soup and bread sticks thing!)  So I was able to find a copycat recipe and I have to admit it was delicious and a soup I'll probably be making for a long time to come.


Olive Garden's Copycat Zuppa Toscana
Adapted from restaurant.food.com

1 lb Italian sausage or ground meat
2 large russet baking potatoes, sliced in half, and then in 1/4 inch slices
1 large onion, chopped
2 garlic cloves, minced
2 cups kale or 2 cups swiss chard, chopped
2 (8 ounce) cans chicken broth
1 quart water
1 cup heavy whipping cream
 
1) Take sausage out of casings (if there are any). Brown sausage in your soup pot.   Alternatively, if you just have some ground pork or chicken, you can use this and season with 1/2 tsp garlic powder, 1/4 tsp chili flakes, and 1 tsp fennel seed.
2) Add chicken broth and water to pot and stir. 
3) Place onions, potatoes, and garlic in a separate pot.
4) Cook on medium heat until potatoes are done.
5) Add to your soup pot with sausage.
6) Salt and pepper to taste.
7) Simmer for another 10 minutes.
8) Turn to low heat.
9) Add kale and cream.
10) Heat through and serve.
Optional:  I added some spinach too for some extra veggies.  Wonderful!

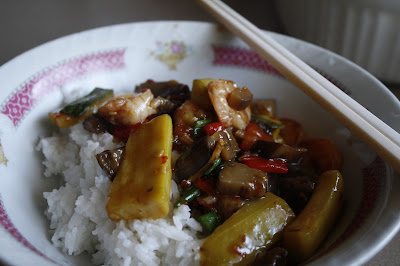
Shrimp and Eggplant in Spicy Chili-Garlic Sauce

In Austin, my family and I have a favorite eatery for authentic Chinese food, Hoa Hoa.  The staff practically know our faces and greet us with warm, knowing smiles.  One of my favorite dishes is their eggplant in garlic sauce.  I'm still trying to tweak my recipe to get it just like Hoa Hoa, but this is a close one with my own little additions.  Feel free to throw in anything that you desire to appease your palette.  You can add mushrooms, bamboo shoots, spinach, etc.  The world is your stir-fry!


Shrimp and Eggplant in Spicy Chili-Garlic Sauce
Adapted from Saveur.com

5 Indian eggplant, about 1 lb. (substitutions: 1 round American or 3 Japanese)
1 zuchinni, diced or cut in thick matchsticks
2 tbsp. chili-garlic sauce
2 tbsp. thin soy sauce
2 tbsp. Chinese red rice vinegar
2 tbsp. shao hsing (rice wine)
1 tbsp. sugar
7 tbsp. vegetable oil
1/4 cup shrimp, shelled and deveined
2 tbsp. finely minced garlic
2 tbsp. finely minced ginger
1/2 cup diced red bell pepper
1/2 cup chopped scallions

1) Trim the stem and ends from the eggplant and cut eggplant into 1/2'' x 2 1/2'' strips.   Prepare zuchinni as indicated.

2) In a small bowl, combine chili-garlic sauce, soy sauce, vinegar, rice wine, sugar, and 2/3 cup cold water.

3) Heat a 14'' flat-bottomed wok or skillet over high heat until hot but not smoking. Add 3 tbsp. oil and half the eggplant and stir-fry 2 minutes, or until some of the eggplant begins to brown and soften. Transfer eggplant to a plate. Repeat with remaining eggplant, zucchini, and 3 tbsp. oil, transferring to the plate with first batch.

4) Add remaining 1 tbsp. oil, shrimp, bell pepper, garlic, and ginger, and stir-fry about 1 minute, or until golden and fragrant. Return the eggplant to the wok.

5) Restir the chili sauce mixture and swirl into the wok. Bring to a boil over high heat. Reduce heat to medium, cover, and cook 5-8 minutes or until eggplant is just tender. Stir in scallions and serve immediately with white jasmine rice.

6) Optional: If you like a nice sauce, you can mix 1 TB cornstarch and 4-5 TB water.  Add this to the final stir fry to get a nice sauce.


Monday, February 18, 2013

Columbian Chicken Soup ("Sancocho")

A few summers ago, Mr. Man and I took a hiatus from life and threw our backpacks on and traveled to South America for three months.  It was an amazing experience, to say the least.  Each day was filled with adventure, meeting new friends, and eating delicious food.

Many of the little eateries that we'd dine in for "almuerzo" (lunch/dinner), consisted of a delicious soup followed by a plate of rice, beans, salad, and meat.  This delicious soup we found out was "sancocho."  It was a heartwarming bowl of light broth with potatoes, yucca, corn, and either chicken or beef.  To this day, we still talk about it.

Finally, I decided, "Hey, why don't we try to recreate it here!" Duh!  Thank goodness for the Internet.  There were dozens of food blogs bursting with recipes.  After scouring them all to see which one hit the most authentic note of what we remembered, I gathered all of the ingredients and had a trip down delicious memory lane.


Sancocho De Pollo
Adapted from Skinnytaste.com

6 skinless, boneless chicken thighs, diced in 1" pieces
1 tbsp oil
5 scallions, chopped
1 tomato, chopped
4 cloves garlic, chopped
1/2 onion, chopped
1 cup chopped cilantro
3 medium potatoes, peeled and chopped into 2 inch pieces
3 pieces of yucca (about 2 cups)
3 ears corn, cut in half
1 tsp cumin
2 chicken bullion cubes
lime wedges (for garnish)
avacado slices (for garnish)
salt to taste

1) In a large pot, saute scallions, onions and garlic in oil.
2) Add tomatoes and saute another minute.
3) Add chicken pieces and season with a little salt.
4) Saute a few minutes, then add yucca and plantain and fill pot with water.
5) Add chicken bullion, cumin and half of the cilantro and cover pot. Simmer on low for about 40 minutes. 6) After 40 minutes, adjust salt and add potatoes, cook and additional 15 minutes.
7) Add corn and cook an additional 7 minutes or until corn is cooked.
8) Serve in large bowls, and top with cilantro and fresh lime wedges.

This taste even better the next day when all of the flavors have melded together.

Sunday, February 17, 2013

The "I Love Lemon Loaf" Lemon Loaf

Sweet tooth?  We've all got one.  I have a sweet FANG, if anything!  Citrus is a favorite flavor when it comes to my sweet cravings.  It's mild, subtle tones that blend tangy and sweet is a winner in my book.

My Mr. Man is a sucker for a good lemon loaf cake.  He grew up on store bought lemon loaves: unnaturally yellow dense butter cakes with a thick, hardened glaze of too-sweet sugar.  I showed him what a real, homemade lemon loaf cake was all about.  This recipe is so super moist and bursting of lemon flavor.

I found this recipe on Annie Eats which is one of my favorite food blogs.  I adapted it a bit, since I didn't want to incorporate the syrup that I think may make it a bit too "wet" since the cake is already so moist.  This recipe is divine and is perfect for a lazy Sunday afternoon when you have a hankering to switch on the oven.


Monday, February 11, 2013

Brownies-Ooey Gooey Goodness

Usually, I'm not a brownie person.  But this recipe from baking class really became memorable for me.  Not just because these brownies are moist and chock full of chocolate yumminess, but because trimming the brownie edges caused me to end up in the emergency room!!  I was more embarrassed than anything.  It all happened so fast.  The brownies had been cooling and so we were ready to trim the edges and portion out the pieces.  As I was trimming my knife slipped and got me good in the thumb.  I didn't think it was that bad, but it got serious and my instructor said we'd have to either call an ambulance or have someone take me.  I opted for the latter choice since I didn't really want to pay for the ambulance fees.

My boyfriend was actually at a gig and so I had to make him miss his set at the comedy club which I felt horrible about, but I was a damsel in distress!  Of course, he was terribly concerned and didn't bat an eyelash when I called him.  He scurried right over to campus to scoop me up and take me to the hospital to get some stitches. 

While waiting in the waiting lobby for an available doctor, two kids sitting with their ailing father were staring at my hand wrapped in towels.  I could tell they were curious.  Finally, the younger one actually came over and asked me what was wrong with me.  I smiled and sighed, "Brownies, kid.  The brownies got me."


Killer Brownies

Ingredients
6 oz butter
4 oz chocolate chips, melted
1.5 lb sugar
1.25 oz honey
5.5 oz shortening
5 eggs
1.5 oz water
11.25 oz cake flour
2 oz cocoa powder
2.25 tsp salt
7 oz pecans, chopped (optional)
3 oz chocolate chips (optional)

1) Melt chips and butter.  Blend together and set aside
2) Cream sugar and shortening together
3) Add eggs to sugar/shortening mixture.
4) Blend in chocolate to mixture.
5) Sift dry ingredients together and add to mixture.
6) Add nuts and chocolate chips if desired.
7) Pour batter onto greased half sheet pan and bake at 350F for about 30-45 minutes.
8) If you want to be fancy, after the brownies have baked and cooled, you can whip up a quick ganache.  Heat up 6 oz of heavy cream in a saucepan.  Once it reaches a boil.  Remove from heat and mix in 12 oz chocolate chips.  Mix until well incorporated.  You can spread this on top of a nice gooey brownie topping.

Sugar Cookies for Valentine's Day

My local library asked me to teach class on cookies decorating for Valentine's Day.  I thought it was a great idea and tons of fun for the kids.  I finally got through with making 160 cookies!  Hopefully you'll like this recipe as much as I do.

Sugar Cookies (for cookie cutting)
Adapted from http://www.annies-eats.com
Makes about 35-40 cookies depending on shape

Ingredients
1 cup butter
1 cup powdered sugar
1 egg, beaten
½ tsp. almond extract
1 tsp. vanilla extract
1 tsp. salt
2 ½ cups sifted flour

1) Cream butter.
2) Add powdered sugar.
3) Blend in egg, almond extract, vanilla, and salt
4) Add flour 1/2 cup at a time.
5) Chill dough until firm. Roll to ¼” thickness on well-floured surface. Cut with cookie cutters. Place on greased cookie sheets or baking sheets with parchment paper. Bake at 375° for 8-10 min. Cookies should not brown. Frost and decorate when cool.

Friday, February 8, 2013

Key Lime Pie- A Refreshing Treat

When I was younger, my mom would buy us those Yoplait yogurts so we could have snacks after school.  One of my favorite flavors was the key lime pie.  It wasn't until I was much older when I actually had a REAL key lime pie, not out of a yogurt container!!  Crazy, right?

Well, we made key lime pies in baking class and it was delicious.  Many people thought it was too sour, but come on people, it's lime!  It's supposed to have a nice tartness with a subtle sweetness.  So depending on your taste you can either reduce the amount of key limes or increase the sugar.  I hope you enjoy this recipe as much as I do.


Key Lime Pie
Adapted from Professional Baking Wayne Gisslen
Yield: Two 9" pies

Graham Cracker Crust
8 oz graham cracker crumbs
4 oz granulated sugar
4 oz melted butter

1) Mix crumbs and sugar in mixing bowl.
2) Add melted butter and mix until evenly blended; crumbs should be completely moistened by butter.
3) Spread mixture evenly on bottom and sides of pie pan.  Press another pie pan on top to pack crumbs evenly.  Or you can use the bottom of a cup or some kind of weight to press the crumbs down.
4) Bake at 350F for 5-7 minutes.  Cool thoroughly before filling.

Key Lime Filling
8 egg yolks
28 oz sweetened condensed milk
10 oz key lime juice (yes, you'll have to squeeze all those tiny limes!)

1) Beat yolks lightly.  Stir in condensed milk.
2) Add lime juice and beat until smooth.
3) Pour into baked, cooled graham cracker crust.
4) Bake in a 350F oven for 15-20 minutes or until firm to the touch.
5) Let cool and then garnish with whipped cream and lime slices or wedges.

Note: Alternatively, if you don't want to bake it, you can refrigerate the pie overnight.  The lime acidity will partially coagulate the egg and milk proteins so that the filling becomes firm.  But if you're worried about the yolks, go ahead and bake the pie.


Wednesday, February 6, 2013

Cookies: Chocoate Chip vs. Peanut Butter

My local library has asked me to teach a class on decorating cookies for kids.  Though I've had some experience decorating cupcakes, cakes, pastries, etc. I wouldn't say that I'm an expert on the good ol' classic cookie.  I'm not a fan of icing on my cookies anyhow.  But, I've been doing a lot of research and there's so many resources online that anyone can become an expert in a few hours!! 

So, as my butter softens to make my batch of sugar cookies for the kids, I wanted to throw up my recipes for two classics that will never go out of style: chocolate chip and peanut butter.  Personally, chocolate chip is my go-to, but these peanut butter cookies are so nice and buttery, it's a close call.


Chocolate Chip Cookies 
Adapted from Professional Baking Wayne Gisslen

Makes about 2 dozen cookies

4 oz butter (softened)
3 oz granulated sugar
6 oz brown sugar
1 egg
1/2 tsp vanilla
1/2 tsp almond extract
5.5 oz all purpose flour
1/2 tsp baking soda
1/2 tsp salt
6 oz semi sweet chocolate chips
4 oz chopped nuts

Cream butter and both sugars together in stand mixer.  Add egg and combine thoroughly.  Add extracts.  In a separate bowl, sift together flour, baking soda, and salt.  With mixer running, slowly add flour in wet mixture until completely combined.  Stop mixer and fold in chips and nuts.  Using an ice cream scoop (#40), place mounds of cookie dough on buttered cookie sheet (you can also line baking sheet with parchment paper for easy cleanup).  Be sure to leave about 2 inches of space between each mound.  Bake at 375F for 8 to 10 minutes until golden brown.

Peanut Butter Cookies
Adapted from Professional Baking Wayne Gisslen
Makes about 2.5 down cookies

6 oz butter (softened)
4 oz  brown sugar
4 oz granulated sugar
1/2 tsp salt
6 oz peanut butter
1 egg
8 oz all purpose flour
1/2 tsp baking soda

Cream butter and both sugars together in stand mixer.  Add egg and peanut butter to combine thoroughly.    In a separate bowl, sift together flour, baking soda, and salt.  With mixer running, slowly add flour in wet mixture until completely combined.  Using an ice cream scoop (#40), place mounds of cookie dough on buttered cookie sheet (you can also line baking sheet with parchment paper for easy cleanup).  Be sure to leave about 2 inches of space between each mound.  With a fork, press down on each mound to make a criss cross pattern (hash or pound sign).  Bake at 375F for 8 to 10 minutes until golden brown.


Monday, February 4, 2013

Turnovers! Sweet & Savory Varieties

When I was a little girl, my mom would take me grocery shopping and all I could think about was the bakery aisle and the golden apple turnovers that they sold.  In hindsight, I don't know if they were freshly baked or if they merely heated up frozen pastry, but back then, I could gobble up a dozen!  So I've always been partial to any type of turnovers, whether it be sweet or savory.  This recipe uses the same blitz puff pastry as the palmiers.  So it comes in handy when you  make a huge batch of the stuff and then you can divide and freeze.  Whenever you have a hankering for anything that uses puff pastry, just thaw it out and voila!

Blitz Puff Pastry

8 oz Bread Flour
8 oz Pastry Flour (or All purpose)
1 lb Butter, slightly softened
0.25 oz Salt
8 oz Cold water

1) Sift the two flours and salt into a mixing bowl.
2) Cut the butter int othe flour, leaving 1 inch lumps.
3) Slowly add water to flour and mix until absorbed.  I use my hands to mix gently.
4) Let dough rest for 15 minutes.
5) Roll out the dough into a rectangle.
6) Fold the dough into 3 folds.  Wrap in plastic and refrigerate for 15 minutes.
7) Take chilled dough out, roll out again in rectangle and fold into 3 folds.  Refrigerate into 15 minutes.
8) Once again, take chilled dough out, roll out again in rectangle and fold into 3 folds.  Refrigerate into 15 minutes.  Now your dough is ready.

Sweet Filling (Apple) 
2 TB butter
3 medium-large apples (Granny Smith, Fuji, or Gala are good choices), peeled-cored-diced
1/2 tsp cinnamon
2 TB brown sugar

Saute apples in melted butter for about 8 minutes.  Sprinkle sugar and cinnamon on top and saute for another 10 minutes until tender.  Set aside until cool.


Savory Filling (Spinach and Mozzarella)
Olive oil
2 cups fresh baby spinach
1 cup shredded  mozarella
1/4 cup shredded parmasean

Saute spinach in olive oil until wilted.  Season with salt and pepper.  Let cool.  Once cool, drain any excess liquid from spinach.  Combine cheeses and spinach for filling.


Turnovers
If you need to thaw out your pastry, go ahead until it's easy to roll out.

1) Roll out your puff pastry so that its about 1/8" thick.
2) Cut out 4" x 4" squares.  Dab egg wash on two edges of the square.
3) Place about a 2 TB amount of filling in the center of each square and fold over into a triangle.  The egg wash should seal the dough together.
4)  Use a fork to seal edges and use a knife to make slits on top so air can escape.  Brush tops with egg wash.
5) Bake on a buttered baking sheet for about 20 minutes until golden brown.
6)  Let cool and then enjoy!

Sunday, February 3, 2013

Jalepeno Cheese Cornbread...and an apology.

I woke up this morning and was catching up on emails and what not when I realized....'Annie, you didn't post anything yesterday!'  Mentally beating myself up and rolling around on the floor like a madwoman, I slapped myself a few times and gathered my bearings.  Today, there will be TWO postings!  Hazaa!

If, in any case, you were wondering what happened yesterday, I will tell you.  I've been working on a local food truck and it's been really fun, overall.  Since the weather has been warming up, and our location is at a popular park here in town, it draws the crowds and families out who crave to see what's up with this trendy food truck scene since typically there's about five or six who roll out there.  In these instances where the perfect storm has brewed (sunny weather, destination location, popular food scene), the lines at the truck can be 30-40 people deep.  Let me tell you, it's pretty intimidating if you're at the grill, busting your butt and burning your wrists, to turn around and see out the window, the long mazelike tail of people, all dripping with hunger and expectations. 

At least in a brick and mortar, the kitchen is shielded (for the most part), and you're only faced with a rail of tickets when you're in the proverbial 'weeds.'  But here you can actually see people's anticipation; it's tangible.  And of course, our truck is so good, we don't let people down.  But, man, when you're grueling away in a tiny truck space for 8 hours straight, time flies (and you get really thirsty)!  So when I finally got home, hydrated, and washed the grease away and tended to my burns, I fell straight to sleep.   So sorry, for not posting yesterday (I guess I'm just really apologizing to myself, because I don't think anyone's even reading this blog! hazaa!)  Now here we are.

We made this Jalepeno Cornbread recipe in my baking class last semester and I thought it was the bee's knees.  It also was one of our recipes that we made for our final practical in which I aced with flying colors; so it holds a dear place in my heart.  And it doesn't hurt that it's delicious!


Jalepeno Cheese Cornbread
Adapted from Professional Baking, Wayne Gisslen

Ingredients
10 oz pastry flour (or all purpose)
10 oz cornmeal
3 oz sugar
1 oz baking powder
1.5 nonfat milk solids
.375 salt
4 oz eggs, beaten
1 lb 1 oz water
1 oz cornsyrup
6 oz butter, melted
1-2 jalepenos, depending on your desire for that spicy kick
6 oz shredded cheddar cheese

1) Sift all dry ingredients together (first 6 ingredients)
2) Combine all liquid ingredients in a separate bowl.
3) Add liquid mixture into dry ingredients.
4) Gently mix until just incorporated.  Lumps are still okay.
5) Gently fold in the cheese and jalapenos.
6) Grease a baking sheet, pan the batter, and bake in a 375F oven for about 25-30 minutes.
You can also  use a muffin pan.
7) Let cool before eating.  Bon appetit!

Friday, February 1, 2013

Palmiers...once you start, you can't stop!


Palmiers...those lovely heart shaped cookies you see.  Some people call them angel wafers, elephant ears, etc.  Looking at them, you'd think that they'd be pretty complicated to make, but surprisingly after making them in my pastry class, I was shocked at the simplicity.  If you're ready to up your level and gain some serious baking-street cred, take the plunge and make these for your friends.  They'll be so impressed!


So  you need to make Blitz Puff Pastry first, which is as follows:

Blitz Puff Pastry

8 oz Bread Flour
8 oz Pastry Flour (or All purpose)
1 lb Butter, slightly softened
0.25 oz Salt
8 oz Cold water

1) Sift the two flours and salt into a mixing bowl.
2) Cut the butter int othe flour, leaving 1 inch lumps.
3) Slowly add water to flour and mix until absorbed.  I use my hands to mix gently.
4) Let dough rest for 15 minutes.
5) Roll out the dough into a rectangle.
6) Fold the dough into 3 folds.  Wrap in plastic and refrigerate for 15 minutes.
7) Take chilled dough out, roll out again in rectangle and fold into 3 folds.  Refrigerate into 15 minutes.
8) Once again, take chilled dough out, roll out again in rectangle and fold into 3 folds.  Refrigerate into 15 minutes.  Now your dough is ready.

Palmiers
Recipe from Professional Baking, Gisslen
You'll need the blitz puff pastry that you just made and lots of sugar.  Spread a generous amount of sugar in your rolling area.  Take out your chilled dough and begin rolling into a rectangle on top of the sugar to coat.  Keep rolling until the dough is rolled out to about 12-inches wide and 1/8 inch thick.  Sprinkled more sugar on top of the dough.  You want a nice coating of sugar on both sides of the dough.

Determine the center of the dough.  Fold each side halfway to the center.  Then fold each side again so the two folds meet in the center.  Fold one half over the other to make a strip that is 6 layers thick.  Cut into 1/2 inch slices.  Dip each slice into more sugar.

Lay on prepared sheet pan.  Press down each slice with the palm of your hand to flatten lightly.

Bake at 375F until golden brown, about 10 minutes.  Turn the palmiers over and bake a second time for about 5-8 minutes.  Transfer to wire rack to cool.

They should be golden, flaky,  and crispy!